| Here is one of my little progs I have coded for SolidWorks. Most of them are in german, but for this one I have made an international version. If you want to look at my others progs take an overview here. But beware, it's german. If you would like to take a short look at my other pages start at solidworks.cad.de |
Program: mtd - ModelToolsDensity
Current version: Version 1.1.5 from 11/11/1999
Compiled: mtd.exe
Sourcecode: Visual Basic 6 SP3, Sourcecode not free (but Samplesourcecode in API-Tutor
Kapitel 4 (german))
Examples: -
Download: see table, file with values mtd.ini
(746 Bytes, 8 entries 06.10.1999)
|
|
prog_mtdinst_us.zip (1.489.397 Bytes) | default english texts, with setup und VB6-runtimes (please download other language files separatly) |
|
|
prog_mtd_de.zip (23.721 Bytes) | default german texts, without Setup |
|
|
prog_mtd_us.zip (23.702 Bytes) | default english texts, without Setup |
| prog_mtd_es.zip (24.909 Bytes) | default spanishe texts, without Setup |
Languagefiles: (please copy them as default.ini in the programfolder)
|
|
German | mtdlng_de.ini (3.653 Bytes) |
|
|
English | mtdlng_us.ini (3.536 Bytes) |
| Spanisch | mtdlng_es.ini (3.476 Bytes) (many thanks to Daniel Fernández for the spanish translation) |
value addition
| 48 entries, many thanks to Fredy Faber | |
No special installation needed, simply download the ZIP and unpack it to any folder. Be sure to scan for viruses, I use Norton Antivirus and McAfee, but you never know ...
The program needs the VB6-runtimes, but usally it is already installed. If the prog wont start for this reason take a look at Microsoft or download the complete package with the setup-routines (1.454 KBytes).
| The actual public version is 1.1 and was released on 10/18/1999. The
sources are not free, but if you are interested you may get them for a little registration
fee; please contact me in this case. If you are only interested in how the SolidWorks contact works you may look at this samplesourcecode (5 KB). Features in this version:
|
 |
You can set the material density for parts in SolidWorks using Extras/Options/Material properties. But you have to edit a number in g/mm³ which is not as comfortable as it could be. This is why I have coded ModelTools - Density. This little prog let you choose a material from a list with real names (like steel) and set its value in SolidWorks.
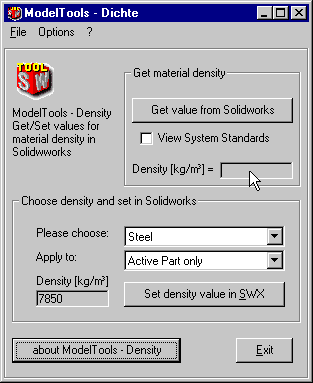
Download and installationTo try mtd.exe you only have to download the package and unZIP it to any folder you like. Be sure, that all the needed files are in the same directory. There have to be mtd.exe, the executable program itself, and the two INI-files mtd.ini (with the sample materials and their values) and default.ini (which is the language file). In the ZIP there are also some sample language files called mtdlng_XX.ini. These are the adapted language files (I have provided de for german and us for english textes, but beware I'm german and therefor the english version may not be so good as you expect :-)) Using the programIf you start mtd.exe you should see the main window like the one on the right. There are three areas: Menus, Get density and Set density Get material densityChoose if you want to see the system standards or the active parts value and click on the button. In the textfield you should now see actual value. If there was no SolidWorks running on your machine the prog tries to start one! Set the desired valueIn the lower part of the window you first choose the desired material from the dropdown list by clicking it and picking the value (like in any other window-application). If you miss the value you are looking for you (or your administrator) have to edit the valuelist (mtd.ini). In the "Apply to:"-box you may choose where to apply the choosen value and then you click the button "Set density ...". If there was no SolidWorks running on your machine the prog tries to start one! OptionsIn the menus you may choose most of the options like on the main windows. Under the Options menu there is also an option to toggle the Always on top - property of the program. If you choose Always on top the main window sticks itself above every other window on your desktop. If you uncheck the option it behaves normally. AttentionBeware that all values for density are displayed and entered in the standard SolidWorks (and SI-) units kilogram / m³, which is (at least for me) a little bit strange. |
 MTD Main window
Choose material
Apply to ...
also choosable in the menu |
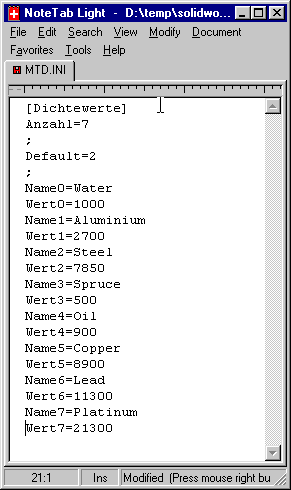
The values and names for the materials are stored in mtd.ini, which should be located in the same folder as mtd.exe. You may download my actual version of mtd.ini and copy it to the program folder.
| If you would like to edit or expand this list the only thing you have to
do is to open it in your favorite editor (I prefer NoteTab Light, a really good freeware editor) and add some name and
value pairs. Be sure not to alter the entrie-names, they have to stay german. But you could edit any value of the entries (the part behind the =). If you would like to add a material look for the next free number and type in the two lines Name#=NewMaterial and Wert#=1234 (the density value for NewMaterial in kg/m^3). You also have to change the count for the entries in Anzahl= to the highest number. The Default= key is the number for the entry which is displayed as the default. You may enter as many comments as you like. Each line beginning with a ; is treated as a commentline. The provided mtd.ini is delivered in two languages. To add a new language or switch to another language simply uncomment all the Name#= keys with your choosen language and comment the others. That's it. |
 |
Editing the language file or translate it to another language is also no a serious matter. Backup the default.ini file (or copy on of the provided mtdlng_XX.ini files) and edit the values. The program mtd.exe uses the file default.ini in the same folder as the executable.
You only have to load it in the editor of your choice and edit the values of the entries. May be it looks a little confusing in the beginning, but the following tables should give you an idea of what entry is for what purpose:
| Pretext | Sample | What's this |
|---|---|---|
| frm... | frmModelToolsDichte | Form (which window) |
| chk... | chkSWXSystemStandard | Checkbox |
| cmb... | cmbAnwendenAuf | ComboBox (= DropDownlists) |
| cmd... | cmdSetDensity | Commandbutton |
| lbl... | lblAnwendenAuf | Label (simple textfields) |
| mnu... | mnuOptionen | Menu (Entries in the menu) |
For the different controls there are some or all of the following keys you may edit:
| Key | What's this | Remark |
|---|---|---|
| Caption | the displayed text for this control | The most controls have this key. In most cases this is the one you have to edit / translate for a new language |
| ToolTipText | little yellow helptext | The tooltiptexts come up if you point to a control and let the pointer stay there for a little while (let's say a second or so). It's the "first aid", so translate it |
| Default | default displayed value | The default-value is used by dropdown lists and you should enter the value for the first entry to display in this list. Be sure to enter a valid value. |
| AnzahlListe | number of entries in a list | For lists and dropdownlists you should enter the correct number of entries |
| AddItemXX | add a entry in a list | You may add other values to the list. XX ist a number in order. Be sure
to edit the highest number in "AnzahlListe". In mdt.ini you should not use this key until there is no need to do this |
A last tip: do not edit any key or value if you don't know what is it for :-))
It would be very nice if you could send me your Edits (for the english version ...) or a complete new language file for any other languages you have adapted. I will provide them with the downloads and but it one my website.
If you could get this prog to work or just want to give me a little feedback you may mail me at Stefan.Berlitz@gmx.de or take a look at my (german!) website at http://home.wtal.de/berlitz/SolidWorks
DISCLAIMER
THIS SOFTWARE AND THE ACCOMPANYING FILES ARE DISTRIBUTED "AS IS" AND
WITHOUT ANY WARRANTIES WHETHER EXPRESSED OR IMPLIED. NO REPONSIBILITIES
FOR POSSIBLE DAMAGES OR EVEN FUNCTIONALITY CAN BE TAKEN. THE USER MUST
ASSUME THE ENTIRE RISK OF USING THIS PROGRAM.
![]()
| Kritik und Anregungen bitte an Stefan Berlitz. Letzte Änderung dieser Seite am Donnerstag, 01. Februar 2007 17:40 |